A bit of a delay getting this one up, but as usual I got distracted with
other things and that spread out my painting time dramatically.
With
this post, I have officially started on the highlighting (mid-toning, I
guess, but still! Progress!). As mentioned in the previous post, I have
done all my washes for shading purposes, and now I am at the point of
bringing out the colours one by one. Without further ado (and because I
have so many bloody formulas to copy down), here are some pics:

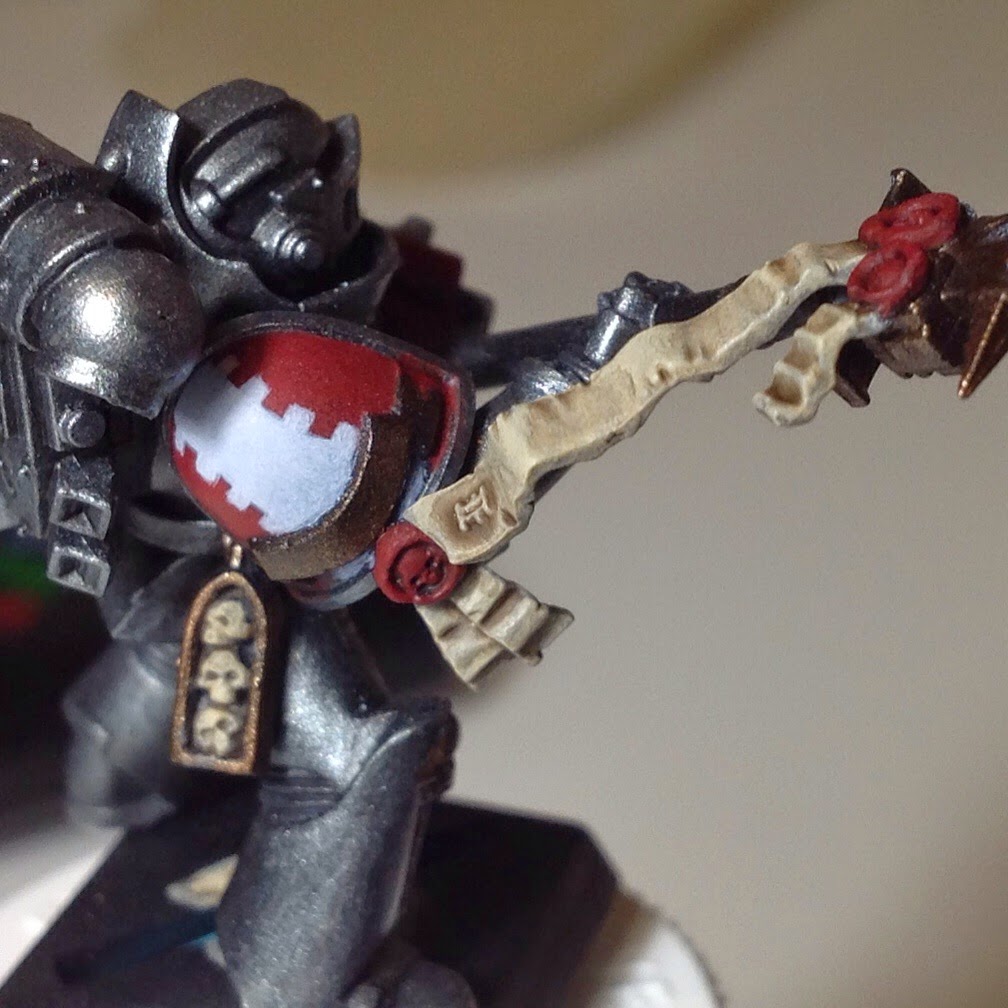 These
two highlight the shading for the reds (mainly 1st pic), and the beige/parchment (lower pic).
They will look much better with further highlighting.
These
two highlight the shading for the reds (mainly 1st pic), and the beige/parchment (lower pic).
They will look much better with further highlighting.
With the reds in particular, I went pretty random with the way the light hits the stormbolter. When doing shading, I try to pick a "virtual light source," generally coming from above, and try to stick to it, but after about 30 seconds I just throw any principles out the window and go somewhat random. At this point in the game, my skills are simply not that good to replicate realistic light physics.
Maybe, after I paint 50 of these buggers, I will have a better grasp of light physics. For now I just tried to make it look *somewhat* plausible, and hope that I don't end up associating with superior painters down the road, so I am not secretly mocked at my impossible light sources.
More pics &
everything else after the break.
These next two pictures show some of the blue shading. As with the ones above, these are not super clean either, but will look better with some more highlights.

You can also see the "blue" wash on the white areas in these two. This wash is especially rough looking on the Halberd, and am hoping that I can bring it up to a better standard as I reapply the "white" mid-tones.
 (Editor's note: These close-up pics definitely give a better sense of what I am talking about, from a step-by-step sense, but man do they really emphasize the small errors and mistakes. I guess that's only natural, but I need to apply some sort of a haze filter or something, it's making me look bad!)
Now, on to the formulas!
The first thing I did for this part was go back and give the gunmetal areas some selective washes. This was done as I realized some areas in particular (hand joints, seams between metal panels, ridges along the backpacks, etc.) did not really end up remaining noticeably dark during my first go through building up from black to gunmetal. I don't really have pics for this, but, as a rule of thumb: If you look at your model and find areas that *should* have a defined dark border between them but dont, then this step is a good idea.
Metallic Shading Wash:
1 : 2 - Black Shade : Magic Wash
For this I just loaded up my brush a bit, and selectively applied it to areas where I thought would help. It's quite a light wash, and won't have a harsh darkening effect, but I do feel it helps subtly. You can also go with 1:1 ratio instead, giving you a fair bit more darkness, but this would be less forgiving if you get it onto areas that you want to remain lighter.
The next part was my beige/parchment wash, which had to be done in two parts, as I felt the first coat was not heavy enough. I used this on pretty much all the beige areas, so parchment, skulls, etc. Formula below:
Parchment Shading Wash:
1 : 1 - Umber Shade : Magic Wash
Some may ask: If you found the coat was too light, why did you dilute it in the first place, dummy????
Now, the answer to that is simple. First and foremost, if you have read some of my other posts, you may know that I have had a lot of problems with Vallejo's Shades, in particular with them going off-colour as they dry. This has happened to pretty much my entire line of Shades at some point. It is supremely frustrating. I have found the dilution with the magic wash reduces the occurrence of this travesty to almost nothing. This, in my books, is more than worth having to do multiple washes.
Second, I do find their Shades to be a bit too thick, and even if the off-colour thing didn't occur, getting the wash to settle in the recesses nicely seems more difficult when they are undiluted.
Happy?
Next, I did a quick "leather" wash, which really just included the back of Mr. Justicar's tabard/loincloth/whatever you call it. I did one wash, but looking at it now, would probably benefit from a few more.
Leather Shading Wash:
1 : 2 - Black Shade : Magic Wash
Finally, I washed the first round of the remaining Purifers' white helms and heraldry, using the same formula as the first go-around (see pt.5 for reference).
This step took 55 minutes over 1 painting session.
The next session was just a quick go-over the sections that I needed to give a second coat to, namely the parchments and the white helms.
This step took 10 minutes over 1 painting session.
The next part was shading of the reds and blues. Since these are fairly flat surfaces, the main challenge (as I mentioned above) is to shade them naturally so it looks like the light is coming from one source. Mixed results for me. I generally had to do a few (3-5 in some cases) coats, but they were pretty thin and I used a blowdryer on low to speed up the drying process if needed. Formulas below:
Red Shading Wash:
1 : 1 : 2 - Sepia Shade : Black Shade : Magic Wash
Blue Shading Wash:
1 : 1 : 2 - Blue Shade : Black Shade : Magic Wash
This step took 50 minutes over 1 painting session.
I was going to keep going but this post is getting really long, so will split it up into two. Besides, that basically covers most of the shading anyway.
Total Painting Time for Part 7: 1 hours, 55 minutes over 3 painting sessions.
Total Painting Time to date: 34 hours, 35 minutes over 27 painting sessions.
____________________
The shading was a fairly successful step for me, as I feel I am quickly getting to the end of this journey. Unfortunately, at the end, all that awaits me is more of these buggers...
The next step will focus on the gold trim, getting it all the way up to final highlights, as well as the white areas on the purifiers (which I will finish today, hopefully).
The next step will focus on the gold trim, getting it all the way up to final highlights, as well as the white areas on the purifiers (which I will finish today, hopefully).
On the vallejo shades...I found they leave a "texture" behind sometimes when they dry. I gave up trying to use them as shades, and instead use them to put that texture on things, to add variance. I think I've almost gone completely to secret weapon washes now.
ReplyDeleteThat blue is fantastic btw. I think you could exaggerate your reds a bit, the shade vs the highlighted section is very close to one another. It's a very subtle highlight. Depends on what you are going for! I think you could hit the very edge with another brighter highlight to get even more pop if you wanted.
That blue is just fantastic though :). I also like your "total painting time" I have no idea how much time I spend painting. It's a mystery to me.
Yeah, I am struggling to keep my loyalty with Vallejo, they seem to be quite hit or miss. That said, I have had some success with mixing their Shades with my "magic wash" formula. I also want to give their Inks a try at some point down the road. The SW stuff looks promising, I may have to branch out, I just love the dropper bottle format. It makes the OCD part of me feel warm and fuzzy.
DeleteThanks! The blue was a surprise to me as I haven't painted with that colour before (and I actualy went into the store looking for a slightly darker one, Ultramarine Blue I think, but this was all they had). I was happy with the results and how it matched with my darker Imperial Blue basecoat.
Yeah, both the blues and the reds are still pre-midtone and highlight, so hopefully once I add those in, we will be good to go. I don't know if these suckers will be finished before Christmas (read: extremely unlikely) but I am looking at what's left to do, and based on that I aim to have most of the highlights complete by next week before the madness begins.
The total painting time is a double edged sword. Each time I look at it, I shake my head in sadness, but it also motivates me to try and speed up my processes. I need this motivation, because let's face it, 35+ hours for 5 GK's is sadness to the power of misery.
Don't ever think of painting time like that. Anytime painting is good time. It is moving towards a constant goal of improvement and expression. Never regret that time spent!
DeleteYou want to see regret on time spent? I'll pull up some of my games in my steam account, like Skyrim :). (139 hours....I should not have done that!)
Yeah I guess you are right. It's not so much the time invested, it's just that I thought I'd be done these guys by now and on to something else...
DeleteAs for video gaming, I hear you. Between the two, I have amassed enough hours that I could have built the Pyramids instead. But then, who really needs a pyramid or three?